Showing posts with label Terrain. Show all posts

Monday, 28 July 2025

Future Wars Update 012 - Additional Buildings 3


Following my last update quite sometime ago on the Additional Buildings for my Future Wars Project, I have recently been getting some progress on these terrain pieces to get them into a usable state, which included adding a few pieces to the collection.

I had decided around the end of last year to expand my collection of this range of models and looked to pick up additional habs, hub units, walkways and a few bits and bobs to make my set-up much more adaptable and potentially high-rise (ish).


Time flies as they say and when I picked up the original CASHstack set pieces they were produced by Warmill who are now defunct and their ranges are now produced by TT Combat, though I note several parts of the previous Warmill ranges have never made it back into production which is a shame. The Warmill Ultra-modern terrain range were particularly good.

It would seem that several bits, specifically the large and small hab units have been re-tooled (to a much lower quality IMO) and very annoyingly with slightly differing dimensions. The units being slightly shorter in overall length with the locating lugs/cut-outs in differing locations. This means you can't stack the old Warmill units with the new TT Combat pieces (without quite a bit of butchering that is) and the newer pieces lack the internal partitions that the Warmill ones had, plus the detailing lining is much coarser and often inaccurate.


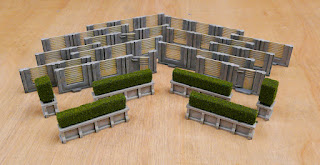
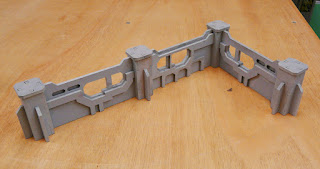
I have assembled, primed and base coated all the original pieces along with the majority of the additional pieces and accessories (with the exception of one large hab and a couple of hubs and supports still to assemble in the fullness of time).

All the pieces have been grey primed and spray base coated in a light ochre/bone and then a heavy directional coat of white to give a bit of graduation from top to bottom which has worked fairly well. I've now started detailing the panelling etc and am looking to complete the windows with coloured film to add to the 'moderne' look. I'm maintaining a limited colour pallette throughout and still deciding if I'm going to apply any weathering to the completed models or not. I'll probably go with a limited effect and not too worn look, but might try a couple of pieces as bit more 'used' to see if this appeals.

The main area's and details have all been air-brushed but find it's actually fairly easy to do the details with a filbert brush and stay within the lines and a lot less faff than masking off fiddely bits anyway.


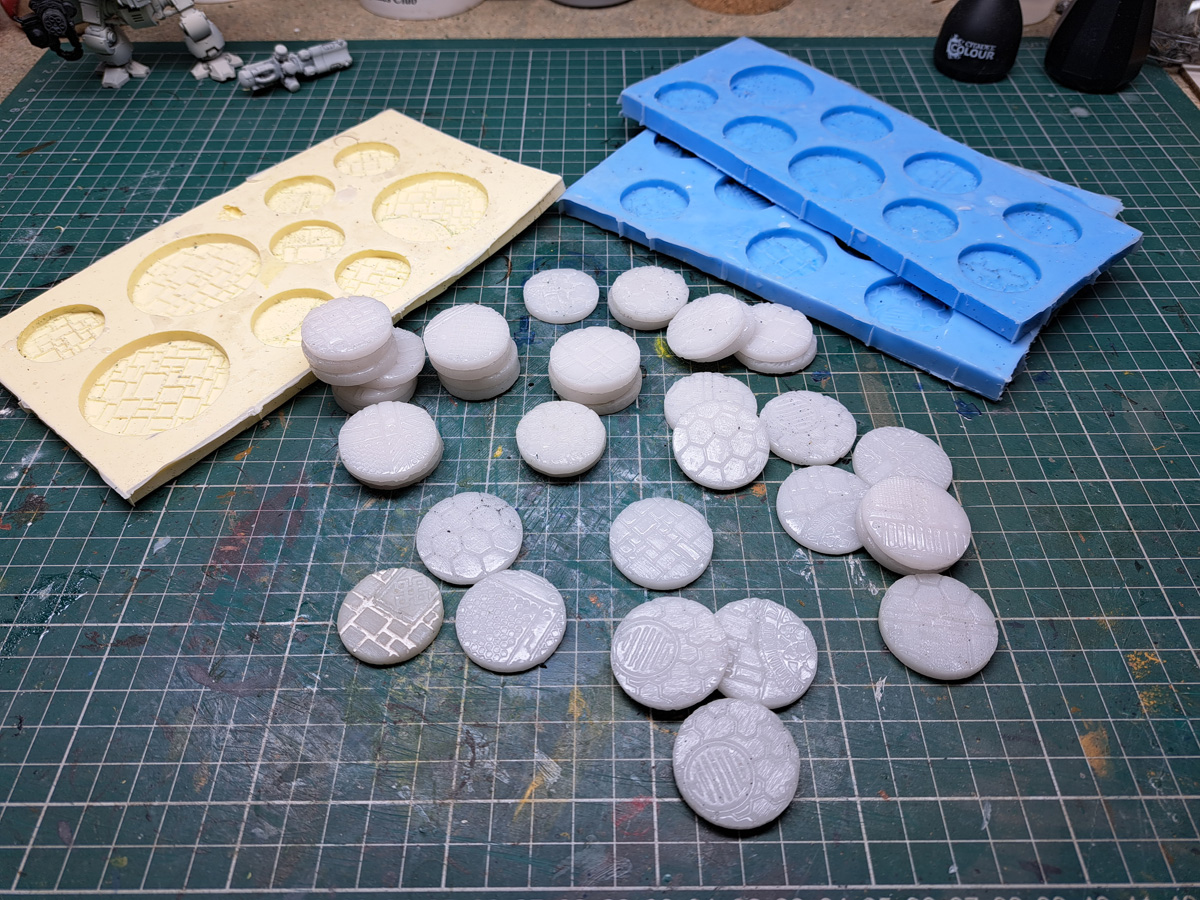
I have also made up some small infill pieces from the off-cuts and push-outs from the mdf sheets for balcony end pieces and stairways landing rails to keep things looking less open. The other manufactured accessory I'm working on is to produce simple 'pavement basing' for the additional roof balcony pieces that are not used when stacking the hab units so they can be used to double up as fencing or walling.

All in all enjoying the upgrading and progress to date but things have stalled now as I'm looking to push on with some figure painting between other projects, mainly DIY and woodworking along with some Man-cave upgrades occupying my free time recently.

Will up-date on progress on this one as it happens.

Thursday, 17 August 2023

All about the Base - Remix


Following on from my recent experiments with modelling and casting resin bases, I had decided I wanted to try an alternative casting material and aware that I had used polyester resin previously (only because that's what I had lying about) which is not the first choice I procured some fastcast polyurythane resin along with resin dye to see how that turned out.

First attempt using the previously made base moulds was partially successful as I mixed too much resin, basically more than I could pour before it began to set. Living up to it's name as 'Fast Cast'. What I managed to pour worked out fine and trying again with half the amount of resin produced a variety of bases fairly easily and a lot quicker and less smelly than the polyester, all of which was nice.

The castings are a lot sharper, as the filler I had used in the polyester casting did blur things a bit though I did like the 'feel' of the castings produced. Polyurythane is obviously the way to go and I picked up some alternative 'white fastcast' at the same time to see how that works out as this has a slightly longer pot life.

I also knocked up a quick mould to cast up some small scatter terrain bits to individualise the various castings which I had deliberately kept fairly blank, especially so I could tart up bases as required with these decorations. This mould worked out fine and I can now produce rubble, scatter and battlefield detritus to my hearts content. A few choice bits are already added to the Kroot Killteam bases which are currently in progress and will post up soon.

Saturday, 29 July 2023

All about the Base


First figs receiving newly cast bases

Having been getting into Killteam recently and investing in the 'Into the Dark' set when released last year I had started building up the teams included in the box with the Kroot band being the first to be assembled.

I had also invested in the 'Imperrium' magazine during Covid as a occupational therapy activity and had started assembling some of the new marine figures and a few others and intended to use the terrain bits included with the magazine for use with Killteam scenario's.

On assembling the first figs and basing them I had decided I wanted to get some modern or techy basing for the figures to difference them from other 40K ranges I already have. Having some of the GSW rollers from a small previous project ,I had tried to put on some rolled results on to the standard plastic bases for a couple of the SM figs but this prooved to give a very thick look to the base which I really didn't like.

Having never really liked the plastic bevelled edge bases from Citadel since first slotta base release back in the day and preferring a fairly thin square edge to my basing I decided I would sculpt up and cast some basing for the Killteam and SM figures and would add in some alternative basing for some of the other bits picked up recently like for my Sisters of Battle and fantasy skirmish bits too.

I had tried some bought resin bases previously from a couple of manufacturers and though the sculpting is OK and often very nice for the chosen products I have found the quality control over the castings is usually fairly poor with a general extreme variance particularly on the thickness of the castings and sanding the the extreme ones to a cosistent level a big pain and extremely laborious.


Selection of scuplted blanks

First up was to produce some blanks and I duly purchased some MDF circular 2mm bases to give a regular size and applied various textured clay pieces to the bases with a bit of chopping and changing and mixing the various textures to give a bit of variety and embelishment for some of the plainer basing.

A fair bit of finishing and minor sculpting and ensuring all the blanks were of suitable sizing and edges square etc. followed.


First moulds and casting results

Next up once I was happy with sufficient variety of bases of varying sizes (28mm, 32mm and 40mm) I made up some moulds with some silcone I had left over, enough for 3 sizable moulds.

The only resin I had to cat up first time was some clear water polyester resin, which although stinks to high heaven does give a fairly sharp cast result but is quite plasticy and hard so I added in a small amount of marble filler which makes the resin a bit friendlier and a much nicer feel. Also makes the casting a bit easier to work with though does blur the casting results slightly.


First bases cast, cleaned, and undercoated

The whole process though fairly labour intensive, especially at the beginning in the blank preparation, is simple enough and fairly enjoyable. I picked at the production in small bursts so as not to sicken myself with extended work.

I also limited myself to the number of casting blanks scuplted so I could produce enough bases for the figures I had already assembled and was wanting to get painted and into some gaming, though this has still been a few months in production over all.


Ready to get painting

Quite happy with the results of the project thus far and had to stop myself in sculpting up more and different bases, but have a few plans for some more and hopefully better basing.

The character and larger models I have planned will be individually scuplted as not wanting to make up castings for ones I would only use once or twice, but I intend to incorporate bits of the castings I have done so as to unify the band or army feel for all the figures.

Will post up the finished articles in due coarse.

Thursday, 6 July 2023

Scatter Terrain - Plasma Pipes


Small update on a recently very quiet blog.

Have been painting up some scatter terrain for Kill Team and general Sci-Fi skirmishy things and just completed the plasma pipes which I have left in their constituent parts so I can use them in any way suits the game in hand.


They did take ages to do and not 100% happy with the way they turned out but decided long enough time spent on them. Was going for a slightly grubby steampunk feel which was sort of acheived. They do look better in the flesh than on photo's (but I'm mucking about with new lighting so added another thing to muck about with) and they'll certainly do as scatter once mixed in with other terrain bits on the table.


On other news I have been getting some gaming in and working on (as usual) multiple projects since last updates and am looking to get a few more posts in to update progress and gaming I've been managing to get in.

More on this shortly.

Monday, 8 August 2022

Scatter Terrain - Collapsed Columns

Wee bit of scatter terrain posting on this one, having recently painted up these plastic bits from GW AoS range for some fill in bits.

Took me a while to do as painted them up between painting other projects and took my time with multiple home made washes and them all but obliterated the nice grime build up and graduated staining with my high-lighting and the pigments which I added to soften the contrast on the shadows/cracks, but lesson learned.

Quite enjoyed the process and pleased enough with the outcome and intenting to add the pieces to three (or four) small scenic bases to bulk out the effect. More anon.


Monday, 17 January 2022

Future Wars Update 011 - Urban Fencing & Planters


Just a small update on some of the terrain bits being worked on over the festives for the Future Wars project with the Modern Fencing set from Warmill being completed and the order from Miniature Scenary arriving before Christmas and the first part of that being completed in the form of the some urban planters ('Paranoia Hedges')..

Both sets were easy to assemble with the Ultra Modern fencing being supplied in coloured card stock with mdf bases, I plumped to paint the assemblies however as I wanted to get an overall colour on them (no unpainted card edges) and on my chosen colour scheme (which in fairness wasn't hugely different from the card colours anyway) as I wanted a pre-cast concrete feel.


Another part of the Miniature Scenary order was for three sets of their 'Scifi Walls' which I've had my eye for a number of years and finally got around to obtaining some.

The first pack is assembled and undercoated with the individual secections assembled but seperate for alternate layout assembly. The miniature scenary kits I noted are a fairly loose fit for their parts and I'm going to have to fill a few bits, mainly the cap stones on the columns where the pegs leave a pretty large gap on them which irritates me a bit.

All in all some useful additions to the terrain options for the FW.

Sunday, 14 November 2021

Future Wars Update 010 - Additional Buildings 2


An quick update on the progress on the Warmill MDF terain recently procured for adding some variety to my Future Wars Urban Tables.

All the kits are now assembled and undercoated and ready for a touch of paint ifn the livery decided upon.

All the kits went together fine and only observation being that with a lot of the pieces being a pretty tight/close fit, once the parts are painted a lot of the demountable/optional pieces won't fit without a bit of filing to loosed up the socket & pin or hook joints. Apart from that all good really.

Decided upon a fairly simple grey/cream/brown painting scheme with a few points of metallic interest here and there and intend to airbrush the majority of the pieces to speed up the painting process.


Sunday, 24 October 2021

Future Wars Update 009 - Additional Buildings

Recently deciding that I needed a bit of variety for my terrain set-ups for my on-going 'Future Wars' project, and specifically a mix up on the buildings front to get a bit of Urban architectural diversity. I had already spotted some tidy bits and bobs with the Warmill ranges that I liked, so after a bit of deliberation I plumped for the Mini Mansion set, an extra Block Unit and a stair pack from the C.A.S.H. range to allow a bit of additional flexibility and some trendy fencing,from their Ultramodern range, all of which arrived in a nice weighty parcel at my door this week.

Digging out the parcel this evening and having a look over the contents, all looked present and correct, I opened up the Block Unit kit as a trail assembly and quickly cobbled together the unit. Taking a little over and hour to clip out and tidy up the pieces and then assemble using some PVA the kit went together nice and easily and now ready (after the glues dried) to undercoat and a spot of paint a suitable and simple paint job tomorrow.

At the same time as ordering up the Warmill stuff, I ordered a bit of scatter terrain pieces from Miniature Scenary over in Oz for a bit of trendy set dressing but these are still in transit but looking forward for a bit of Urban Landscaping when they arrive.

This terrain side project will be on-going but with the ease that the first kit went together, it shouldn't be long before all added to the shelf for a good boost to the Urban options.

Friday, 3 April 2020

Isolation Exercise


Setting myself a bit of of a challenge here and have set up a solo skirmish game using the Thud & Blunder rules. The challenge (exercise) part is that a good part of the table set up includes a large part of unpainted/incomplete terrain and figures and the idea is to complete all the terrain pieces and figures before I complete the game.


I deliberately chose pieces thst were either incomplete or not started in the main and have started working my way through the items on the set-up. So far most of the accessories are complete with just some barrels to do, the GW Osgiliath ruins are done and a couple of the trees are complete.


The warbands are a mixture of complete and incomplete figures (mainly incomplete) and I'll start working my way through the chosen figs next.

The warbands are all set up and 'The Merchant Adventurers', 'The Glitter Twins' and ' The Celesterale' are ready to rock in the scenario 'Bad Day at Ganish Aer'.


I'll introduce the players in more detail as they are painted.


I've a few more bits under way at the moment which I'll post seperately that I'm doing with all the extra time available with this isolation thing going on and flitting a bit from bits to bits as the mood takes me. So more anon.

Take care, stay safe and stay sane!

Monday, 2 July 2018

Terrain Trials - Supplemental

Way back when in the mists of time, when I was trying out some trial works for terrain boards, specifically the Frost Ruins from Heroic Maps under my Terrain Board Trials - Side 2 post, I had had the idea to do some scenery elevation platforms utilising off cuts and spare card bits.

This as is usual with myself took a bit of time to get round to, and following my also usual over engineering a solution, I've finally got round to doing some of these 'elevators'.


Using some strips of polystyrene packing bits I had lying about, were glued together to make a suitable thickness and cut into uniform lengths. These were then clad in foam core to make square and smooth. (You would be surprised on the variance on the dimensions from apparently uniform polystyrene, though low grade packing right enough).

These were then covered in a couple of sheets from the Heroic Maps sheets I had left over but also a couple of extra sheets printed off mirror imaged to cover each piece completely. The elevations then had some photo-shopped 'arches' printed on card and stuck on once again.


Finished articles are pretty robust and definitely useful for adding a bit of change of height to city scape terrain layouts, though a bit more work intensive then previously thought. I will add another couple of blocks in time to increase variety/coverage.

Wednesday, 9 August 2017

Abbey Project Update

Recently put the finishing touches to the latest part of my ongoing Abbey terrain project in the shape of the Gatehouse.


This is the biggest planned part of the project and has been a bit of a slog to get it finished as it had been 'parked' for quite a while, but I took the reins by the teeth and managed to get it finalised.


I found it quite difficult to match the stonework with previous parts as the previous mix of colours provided a much darker looking item than the previous structures, which I put down to the size and shape of the piece rather than the actual colour mix. 

As a result, I have deliberately lifted some highlights on the building to a much brighter colour to help synchronize to the look with the other pieces.


I deliberately kept the overgrowth to a minimum on this piece as I felt that the amount of 'structure' of the model added enough interest to without going overboard with vegetation. 


Also, I intend to make up a couple of filler pieces which can be used as optional additions to make the wall sections more contiguous so added veg would interfere with this development.


The next part of the project planned will be the fairly intact parts of the south range along with a few random rubble piles for scatter use.


Sunday, 30 October 2016

Scatter Terrain - Barriers


I've just recently finished painting up the first batch of six barriers sections for use in my Future Wars project (and of course anything else suitable) with a colour scheme and look I had decided upon a while ago.


There are another eighteen pieces all of which are from Ainsty Castings are fairly ubiquitous around these parts for use in modern/ultra modern games.

The photo's show a slightly lightened version of the paint job and as I was going for a bit used and abused look, this has fairly well worked out. A couple of lessons learnt in the process of producing these bits, not so much in the painting of the pieces but mainly in the production and use of the water slide transfers I made for the pieces.

I made the transfers from downloading images from the interweb and adjusted/edited in photoshop and printed the images out on white transfer paper (to get a sharper, brighter image) and duly sealed the prints prior to use. I cut the transfers to size prior to use but noticed that once soaked and applied, the transfers developed a slight white edge around them where the colouring had leached slightly.

Now once applied and a quick run of wash applied to the edges of the transfers actually looked pretty good and a bit more 'worn' appearing, so a good accident as it were, but unintentional, so I would like to experiment and find out how to avoid this. Probably printing the transfers out on clear sheets will be the likely cure, but we'll see how this works out for clarity.

Having done this first batch as a trial, I'll produce the rest of the two dozen pieces and aim for a uniform finish, but with a bit of experimentation on the transfer front.
Related Posts Plugin for WordPress, Blogger...